Hands-On with Google Cloud HPC Toolkit and Rocky Linux 8 HPC VM Image

Part 1: Car Crash Simulation and Visualization with OpenRadioss and ParaView
Google Cloud announced the general availability of the Rocky Linux 8 HPC VM image on March 23, 2024. This hands-on article will walk you through: (1) how to build an HPC cluster using Cloud HPC Toolkit by Google Cloud and a Rocky Linux 8 HPC VM image, (2) how to run a car crash simulation with OpenRadioss on a Cloud HPC cluster on Google Cloud, and (3) how to remotely visualize simulation results with ParaView on Cloud GPU resources on Google Cloud.
Disclaimer
This article doesn’t cover Google Cloud CLI gcloud installation and configuration or provide a detailed explanation for Google Cloud HPC Toolkit ghpc installation and configuration. For those procedures, please see the following:
- Install the
gcloudCLI - Initializing the
gcloudCLI - Install dependencies of Cloud HPC Toolkit
- Install Cloud HPC Toolkit
After following the instructions on those 4 pages, please also review the following link carefully. It covers the system architecture and budget you need for this project.
Now you are ready to go!
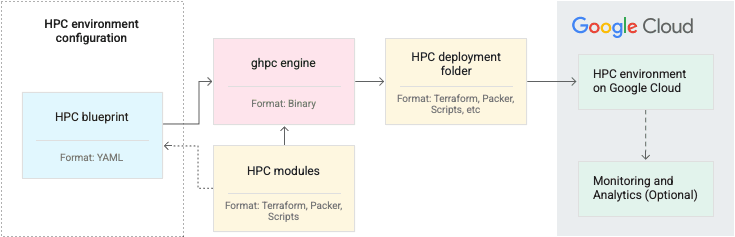
Cloud HPC Toolkit from Google Cloud
Cloud HPC Toolkit from Google Cloud is an open source project that allows users to deploy turnkey HPC environments in a reproducible manner.
Cloud HPC Toolkit consists of 4 main components: (1) HPC blueprint, (2) HPC modules, (3) ghpc engine, and (4) HPC deployment folder. An HPC blueprint is a YAML format definition file that defines your HPC infrastructure on Google Cloud in terms of which HPC modules to use and how to customize them in a reproducible way. For more details on Cloud HPC Toolkit, please review their product overview.
Scientific Computing with Google Cloud Repository
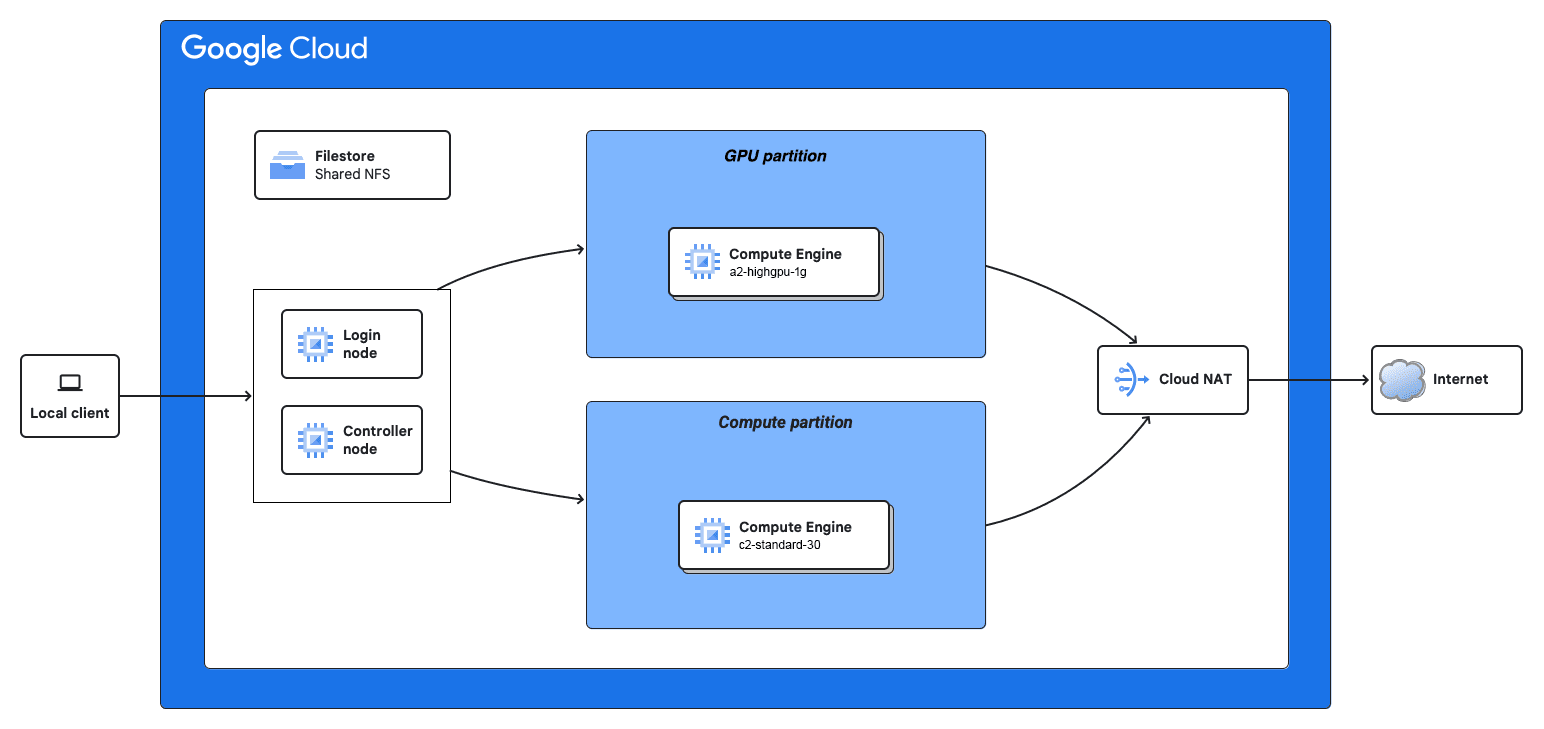
In this article, we will use pre-defined HPC blueprints from the Scientific Computing Examples repository available on GitHub. We will build a SchedMD Slurm managed HPC/GPU cluster on Google Cloud that uses an Apptainer pre-installed Rocky Linux 8 HPC VM image.
Let’s start!
Install Google Cloud HPC Toolkit dependencies
Before you install Google Cloud HPC Toolkit, install the following tools to your laptop. Please see here for details and latest information.
-
Python 3.8 to 3.12
-
Google Cloud CLI
-
Terraform version 1.2.0 or later
-
Packer version 1.7.9 or later
-
Go version 1.18 or later
-
Git
Install Google Cloud HPC Toolkit
This is an example from a procedure when I installed the Google Cloud HPC Toolkit to macOS. For details and latest information, please see here.
Change the directory to your home directory.
$ cd ~/
Clone the Cloud HPC Toolkit and build tool.
$ git clone -b v1.30.0 https://github.com/GoogleCloudPlatform/hpc-toolkit.git
$ cd hpc-toolkit
$ make
Check the version.
$ ./ghpc --version
ghpc version v1.30.0
Built from 'detached HEAD' branch.
Commit info: v1.30.0-0-g08ae77e5
Set the PATH environment variable for your convenience.
$ export PATH=~/hpc-toolkit:$PATH
Log-in to Google Cloud
Log-in to Google Cloud with the following command. This opens up your browser to log-in.
$ gcloud auth login
Check configuration.
$ gcloud config list
[core]
account = ysenda@ciq.com
disable_usage_reporting = True

Your active configuration is: [default]
If you don’t see the project you set up for this example, set the project with the following command. (This example set project is called ciq-sa for configuration.)
$ gcloud config set project ciq-sa
Check configuration again.
$ gcloud config list
[core]
account = ysenda@ciq.com
disable_usage_reporting = True
project = ciq-sa

Your active configuration is: [default]
Required APIs and IAM roles for this article
The following lists the required settings, APIs, and IAM roles for this article. To set up the following settings, you may need your IT team support. (I would like to give a shout-out to CIQ’s Michael Young for his side-by-side support.)
-
Google Cloud project that billing enabled
-
The following API-enabled:
-
Compute Engine API
-
Filestore API
-
Cloud Storage API
-
Service Usage API
-
Secret Manager API
-
-
Default Compute Engine service account enabled in your Google Cloud project
-
The roles/editor IAM role granted to the default Compute Engine service account
-
IAM roles:
-
Compute Admin
-
Compute Network Admin
-
IAP-secured Tunnel User
-
Service Usage Consumer
-
Storage Admin
-
Storage Object Admin
-
Now you are ready to deploy an HPC/GPU cluster using Cloud HPC Toolkit from Google Cloud.
Scientific Computing with Google Cloud Repository
The Scientific Computing with Google Cloud repository is a collection of blueprints for various schedulers used to orchestrate the scientific workloads on Google Cloud Platform.
We will use a great example by Ward Harold at Google Cloud that defines a SchedMD Slurm-managed HPC/GPU cluster on Google Cloud that uses an Apptainer pre-installed Rocky Linux 8 HPC VM image.
Change the directory to your home directory.
$ cd ~/
Clone the Scientific Computing with Google Cloud repository.
$ git clone https://github.com/GoogleCloudPlatform/scientific-computing-examples.git
Change the directory to an Apptainer pre-installed cluster project.
$ cd ~/scientific-computing-examples/apptainer/cluster
Create an “HPC deployment folder” defined by a slurm-apptainer-gpu.yaml blueprint.
ghpc create slurm-apptainer-gpu.yaml --vars project_id=$(gcloud config get core/project)
Deploy an HPC/GPU cluster.
$ ghpc deploy gputainer
This automagically sets up your cluster by orchestrating Terraform and Packer. After you apply every change this tool asks for, your cluster is ready to roll.
Access to log-in node on Google Cloud via IAP Tunnel
To access the log-in node from our laptop, we use IAP Tunnel. Identity-Aware Proxy (IAP) TCP forwarding gives you administrative access to VM instances that do not have external IP addresses or do not permit direct access over the internet. Please see more details here.
SSH to log-in node via IAP Tunnel:
$ gcloud compute ssh \
  $(gcloud compute instances list --filter="NAME ~ login" --format="value(NAME)") \
  --tunnel-through-iap
Build OpenRadioss container using Apptainer
Now you are working on the log-in node on Google Cloud.
Change the directory to your home directory.
$ cd ~/
Clone the OpenRadioss repository.
$ git clone https://github.com/OpenRadioss/OpenRadioss.git
Create a Slurm job script called build-openradioss.sh for building an OpenRadioss container using Apptainer.
#!/bin/bash
#SBATCH --partition=compute
#SBATCH --nodes=1
#SBATCH --ntasks-per-node=12

cd ~/OpenRadioss/Apptainer
apptainer build openradioss.sif openradioss.def
Submit job.
$ sbatch build-openradioss.sh
After the job is completed, check if an OpenRadioss container exists on your filesystem.
$ ls ~/OpenRadioss/Apptainer/openradioss.sif
Download the 2010 Toyota Yaris Impact Model in LS-DYNA® format
To download the model from CCSA, download the OpenRadioss launch file for this simulation. Please see further details about the OpenRadioss launch file here.
$ cd ~/
$ wget -q https://media.ccsa.gmu.edu/model/2010-toyota-yaris-detailed-v2j.zip
$ unzip 2010-toyota-yaris-detailed-v2j.zip
$ cd 2010-toyota-yaris-detailed-v2j
$ wget -q -O YarisOpenRadioss.key https://openradioss.atlassian.net/wiki/download/attachments/30539777/YarisOpenRadioss.key?api=v2
$ cd ~/
Running OpenRadioss using MPI via Slurm
Create a Slurm job script called run-openradioss.sh for running OpenRadioss with a TOYOTA Yaris model. This time, we used a compute partition to run CPU workloads.
#!/bin/bash
#SBATCH --partition=compute
#SBATCH --nodes=3
#SBATCH --ntasks-per-node=12


cd ~/2010-toyota-yaris-detailed-v2j

~/OpenRadioss/Apptainer/openradioss.sif starter_linux64_gf -i YarisOpenRadioss.key -np 36

module load openmpi/v4.1.x
mpirun ~/OpenRadioss/Apptainer/openradioss.sif engine_linux64_gf_ompi -i YarisOpenRadioss_0001.rad
I chose
36cores in total for this job due to hitting the CPU quota limit above this number.
GCP Error: Quota C2_CPUS exceeded. Limit: 100.0 in region asia-northeast1.If your job is in
PD(pending) state, we recommend reviewing theslurmctldlog file on controller node.$ gcloud compute ssh gputainer-controller --tunnel-through-iap $ sudo cat /var/log/slurm/slurmctld.logFor additional quotas, please review https://cloud.google.com/docs/quotas/view-manage.
Submit the job.
$ sbatch run-openradioss.sh
Check your job status by squeue.
$ squeue
             JOBID PARTITION     NAME     USER ST       TIME  NODES NODELIST(REASON)
                 8   compute openradi ysenda_c CF       0:01      8 gputainer-compute-ghpc-[1-8]
Once your OpenRadioss job is completed, let’s work on visualization with ParaView.
Convert ANIM format output to VTK format files
Before we work on visualization, we need to convert OpenRadioss output in ANIM format to ParaView readable VTK format using anim_to_vtk and th_to_csv tools bundled with OpenRadioss.
Create a bash script file anim2vtk.sh under a ~/2010-toyota-yaris-detailed-v2j directory.
#!/bin/bash
BASEDIR=$(dirname "$0")
cd $BASEDIR
for file in $BASEDIR/*;
do
	if [ -n "${file: -3}" ] && [ "${file: -3}" -eq "${file: -3}" ] 2>/dev/null && [[ "${file: -4:1}" == "A" ]]; then
		openradioss.sif anim_to_vtk_linux64_gf $file > "$file.vtk"
		echo "$file is converted"
	elif  [[ "${file: -3}" == "T01" ]] ;then
		openradioss.sif th_to_csv_linux64_gf $file
		CSV="$file.csv"
	fi
done
Convert an ANIM file under ~/2010-toyota-yaris-detailed-v2j to a VTK format.
$ pwd
~/2010-toyota-yaris-detailed-v2j
$ chmod +x anim2vtk.sh
$ export PATH=~/OpenRadioss/Apptainer:$PATH
$ ./anim2vtk.sh
Output looks like the following:
./YarisOpenRadiossA001 is converted
./YarisOpenRadiossA002 is converted
./YarisOpenRadiossA003 is converted
./YarisOpenRadiossA004 is converted
./YarisOpenRadiossA005 is converted
./YarisOpenRadiossA006 is converted
./YarisOpenRadiossA007 is converted
./YarisOpenRadiossA008 is converted
./YarisOpenRadiossA009 is converted
./YarisOpenRadiossA010 is converted
./YarisOpenRadiossA011 is converted
./YarisOpenRadiossA012 is converted
./YarisOpenRadiossA013 is converted
./YarisOpenRadiossA014 is converted
./YarisOpenRadiossA015 is converted
./YarisOpenRadiossA016 is converted
./YarisOpenRadiossA017 is converted
./YarisOpenRadiossA018 is converted
./YarisOpenRadiossA019 is converted
./YarisOpenRadiossA020 is converted
./YarisOpenRadiossA021 is converted

 T01 TO CSV CONVERTER

FILE    = ./YarisOpenRadiossT01
OUTPUT FILE    = ./YarisOpenRadiossT01.csv
 ** CONVERSION COMPLETED
Now the data is ready.
GPU node test
Before we use ParaView, let’s test the GPU cluster with the following test job script.
#!/bin/bash
#SBATCH --partition=gpu
#SBATCH --nodes=1
#SBATCH --ntasks-per-node=4
#SBATCH --gres=gpu:1

nvidia-smi
If you get a similar result to what is shown below, you are ready to go to the next section.
Sun Mar 24 15:11:20 2024
+---------------------------------------------------------------------------------------+
| NVIDIA-SMI 545.23.08              Driver Version: 545.23.08    CUDA Version: 12.3     |
|-----------------------------------------+----------------------+----------------------+
| GPU  Name                 Persistence-M | Bus-Id        Disp.A | Volatile Uncorr. ECC |
| Fan  Temp   Perf          Pwr:Usage/Cap |         Memory-Usage | GPU-Util  Compute M. |
|                                         |                      |               MIG M. |
|=========================================+======================+======================|
|   0  NVIDIA A100-SXM4-40GB          On  | 00000000:00:04.0 Off |                    0 |
| N/A   28C    P0              43W / 400W |      4MiB / 40960MiB |      0%      Default |
|                                         |                      |             Disabled |
+-----------------------------------------+----------------------+----------------------+

+---------------------------------------------------------------------------------------+
| Processes:                                                                            |
|  GPU   GI   CI        PID   Type   Process name                            GPU Memory |
|        ID   ID                                                             Usage      |
|=======================================================================================|
|  No running processes found                                                           |
+---------------------------------------------------------------------------------------+
Build a ParaView v5.12 container using Apptainer
You are still working on the log-in node on Google Cloud.
Change the directory to your home directory.
$ cd ~/
Create a container definition file called paraview.def with the following content.
Bootstrap: docker
From: rockylinux/rockylinux:8

%post
dnf install -y libgomp libX11 libXext
dnf install -y libglvnd libglvnd-egl libglvnd-opengl wget
wget -P /etc/glvnd/egl_vendor.d https://gitlab.com/nvidia/container-images/opengl/-/raw/centos8/glvnd/runtime/10_nvidia.json

%post
mkdir -p /opt/ParaView/5.12.0
wget -O ParaView-5.12.0-egl-MPI-Linux-Python3.10-x86_64.tar.gz "https://www.paraview.org/paraview-downloads/download.php?submit=Download&version=v5.12&type=binary&os=Linux&downloadFile=ParaView-5.12.0-egl-MPI-Linux-Python3.10-x86_64.tar.gz"
tar -C /opt/ParaView/5.12.0 -zxvf ParaView-5.12.0-egl-MPI-Linux-Python3.10-x86_64.tar.gz --strip-components 1
rm ParaView-5.12.0-egl-MPI-Linux-Python3.10-x86_64.tar.gz

%environment
export PATH=/opt/ParaView/5.12.0/bin:$PATH

%runscript
export PATH=/opt/ParaView/5.12.0/bin:$PATH
"$@"
Build the container.
$ apptainer build paraview.sif paraview.def
Create a job script called run-paraview.sh. This time, we used a gpu partition.
#!/bin/bash
#SBATCH --partition=gpu
#SBATCH --nodes=1
#SBATCH --ntasks-per-node=4
#SBATCH --gres=gpu:1

cd ~/2010-toyota-yaris-detailed-v2j
apptainer run --nv  ~/paraview.sif pvserver --force-offscreen-rendering
Submit the job.
$ sbatch run-paraview.sh
Check your job status by squeue.
$ squeue
             JOBID PARTITION     NAME     USER ST       TIME  NODES NODELIST(REASON)
                 4   gpu paraview ysenda_c R       0:04      1 gputainer-gpu-ghpc-0
Once your job is in a R running state, let’s move on to the next section.
Firewall settings
To access the ParaView server port 11111 from your laptop, you need to change firewall settings. Please see details here. gputainer-net-fw-allow-iap-ingress is the one you need to change FW settings. Add 11111 TCP port to your whitelist.
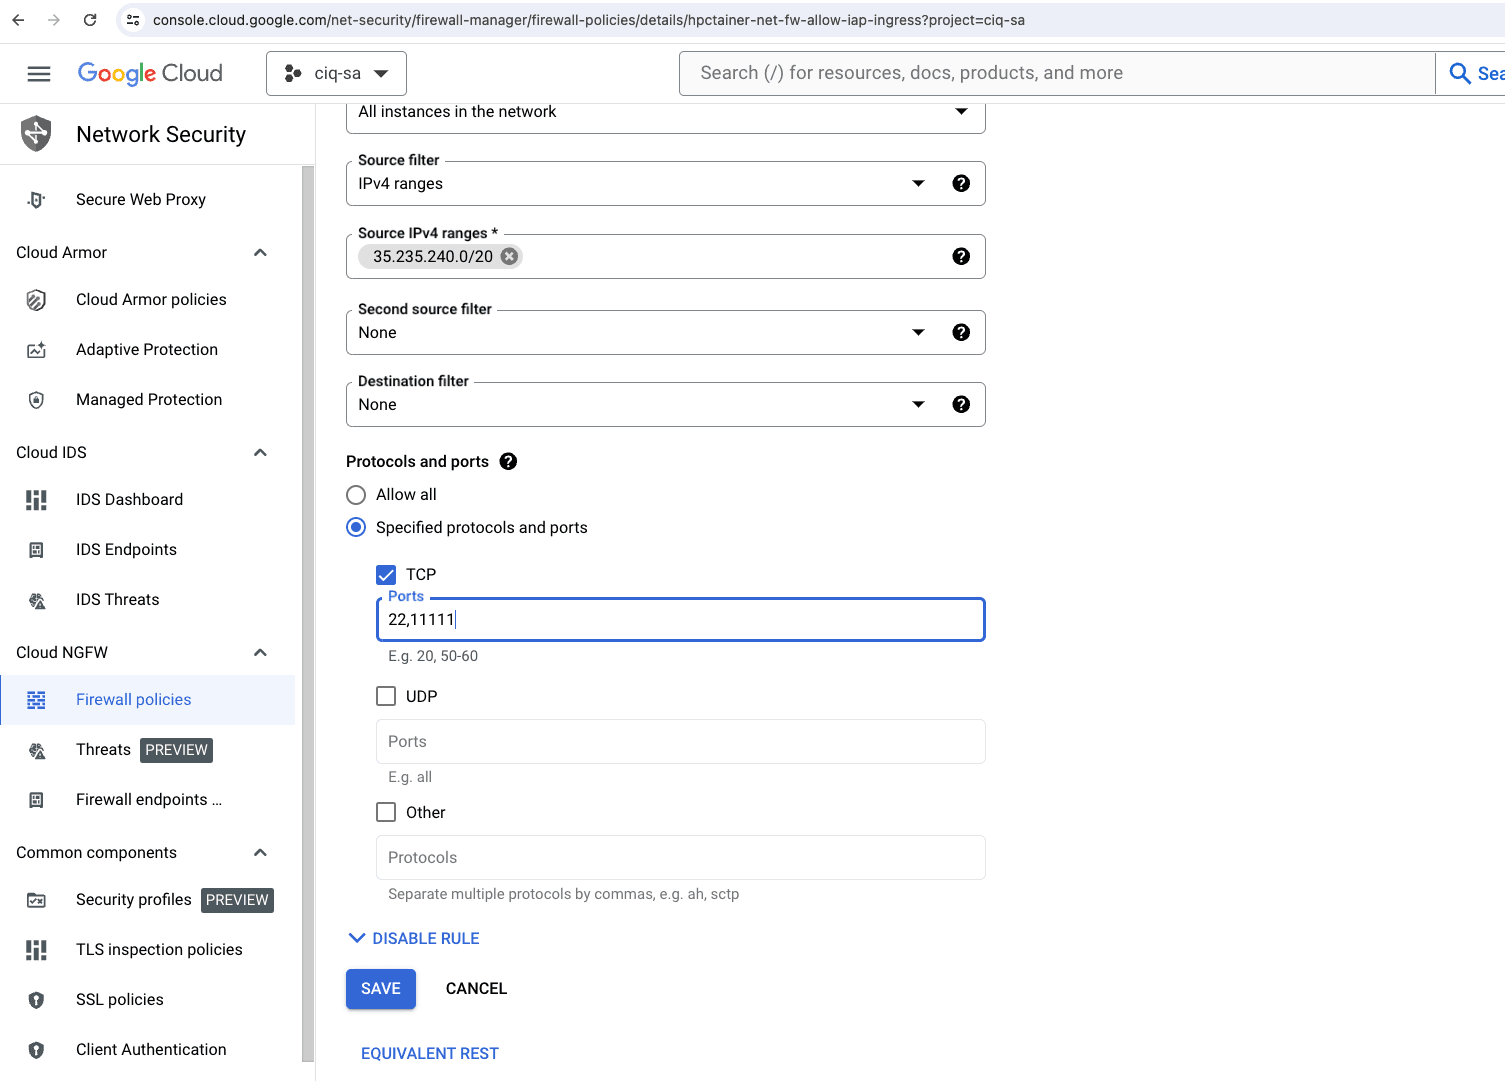
IAP Tunneling TCP port for ParaView server to client laptop
Using IAP Tunnel, you can forward a TCP port from a GPU node on Google Cloud to your local laptop. If your ParaView job is running on gputainer-gpu-ghpc-0, the command looks like the following. (Please see details here. Execute the following command on your laptop.
$ gcloud compute start-iap-tunnel gputainer-gpu-ghpc-0 11111 \
    --local-host-port=localhost:11111
If the TCP port is successfully forwarded, output of this command looks like the following:
WARNING:

To increase the performance of the tunnel, consider installing NumPy. For instructions,
please see https://cloud.google.com/iap/docs/using-tcp-forwarding#increasing_the_tcp_upload_bandwidth

Testing if tunnel connection works.
Listening on port [11111].
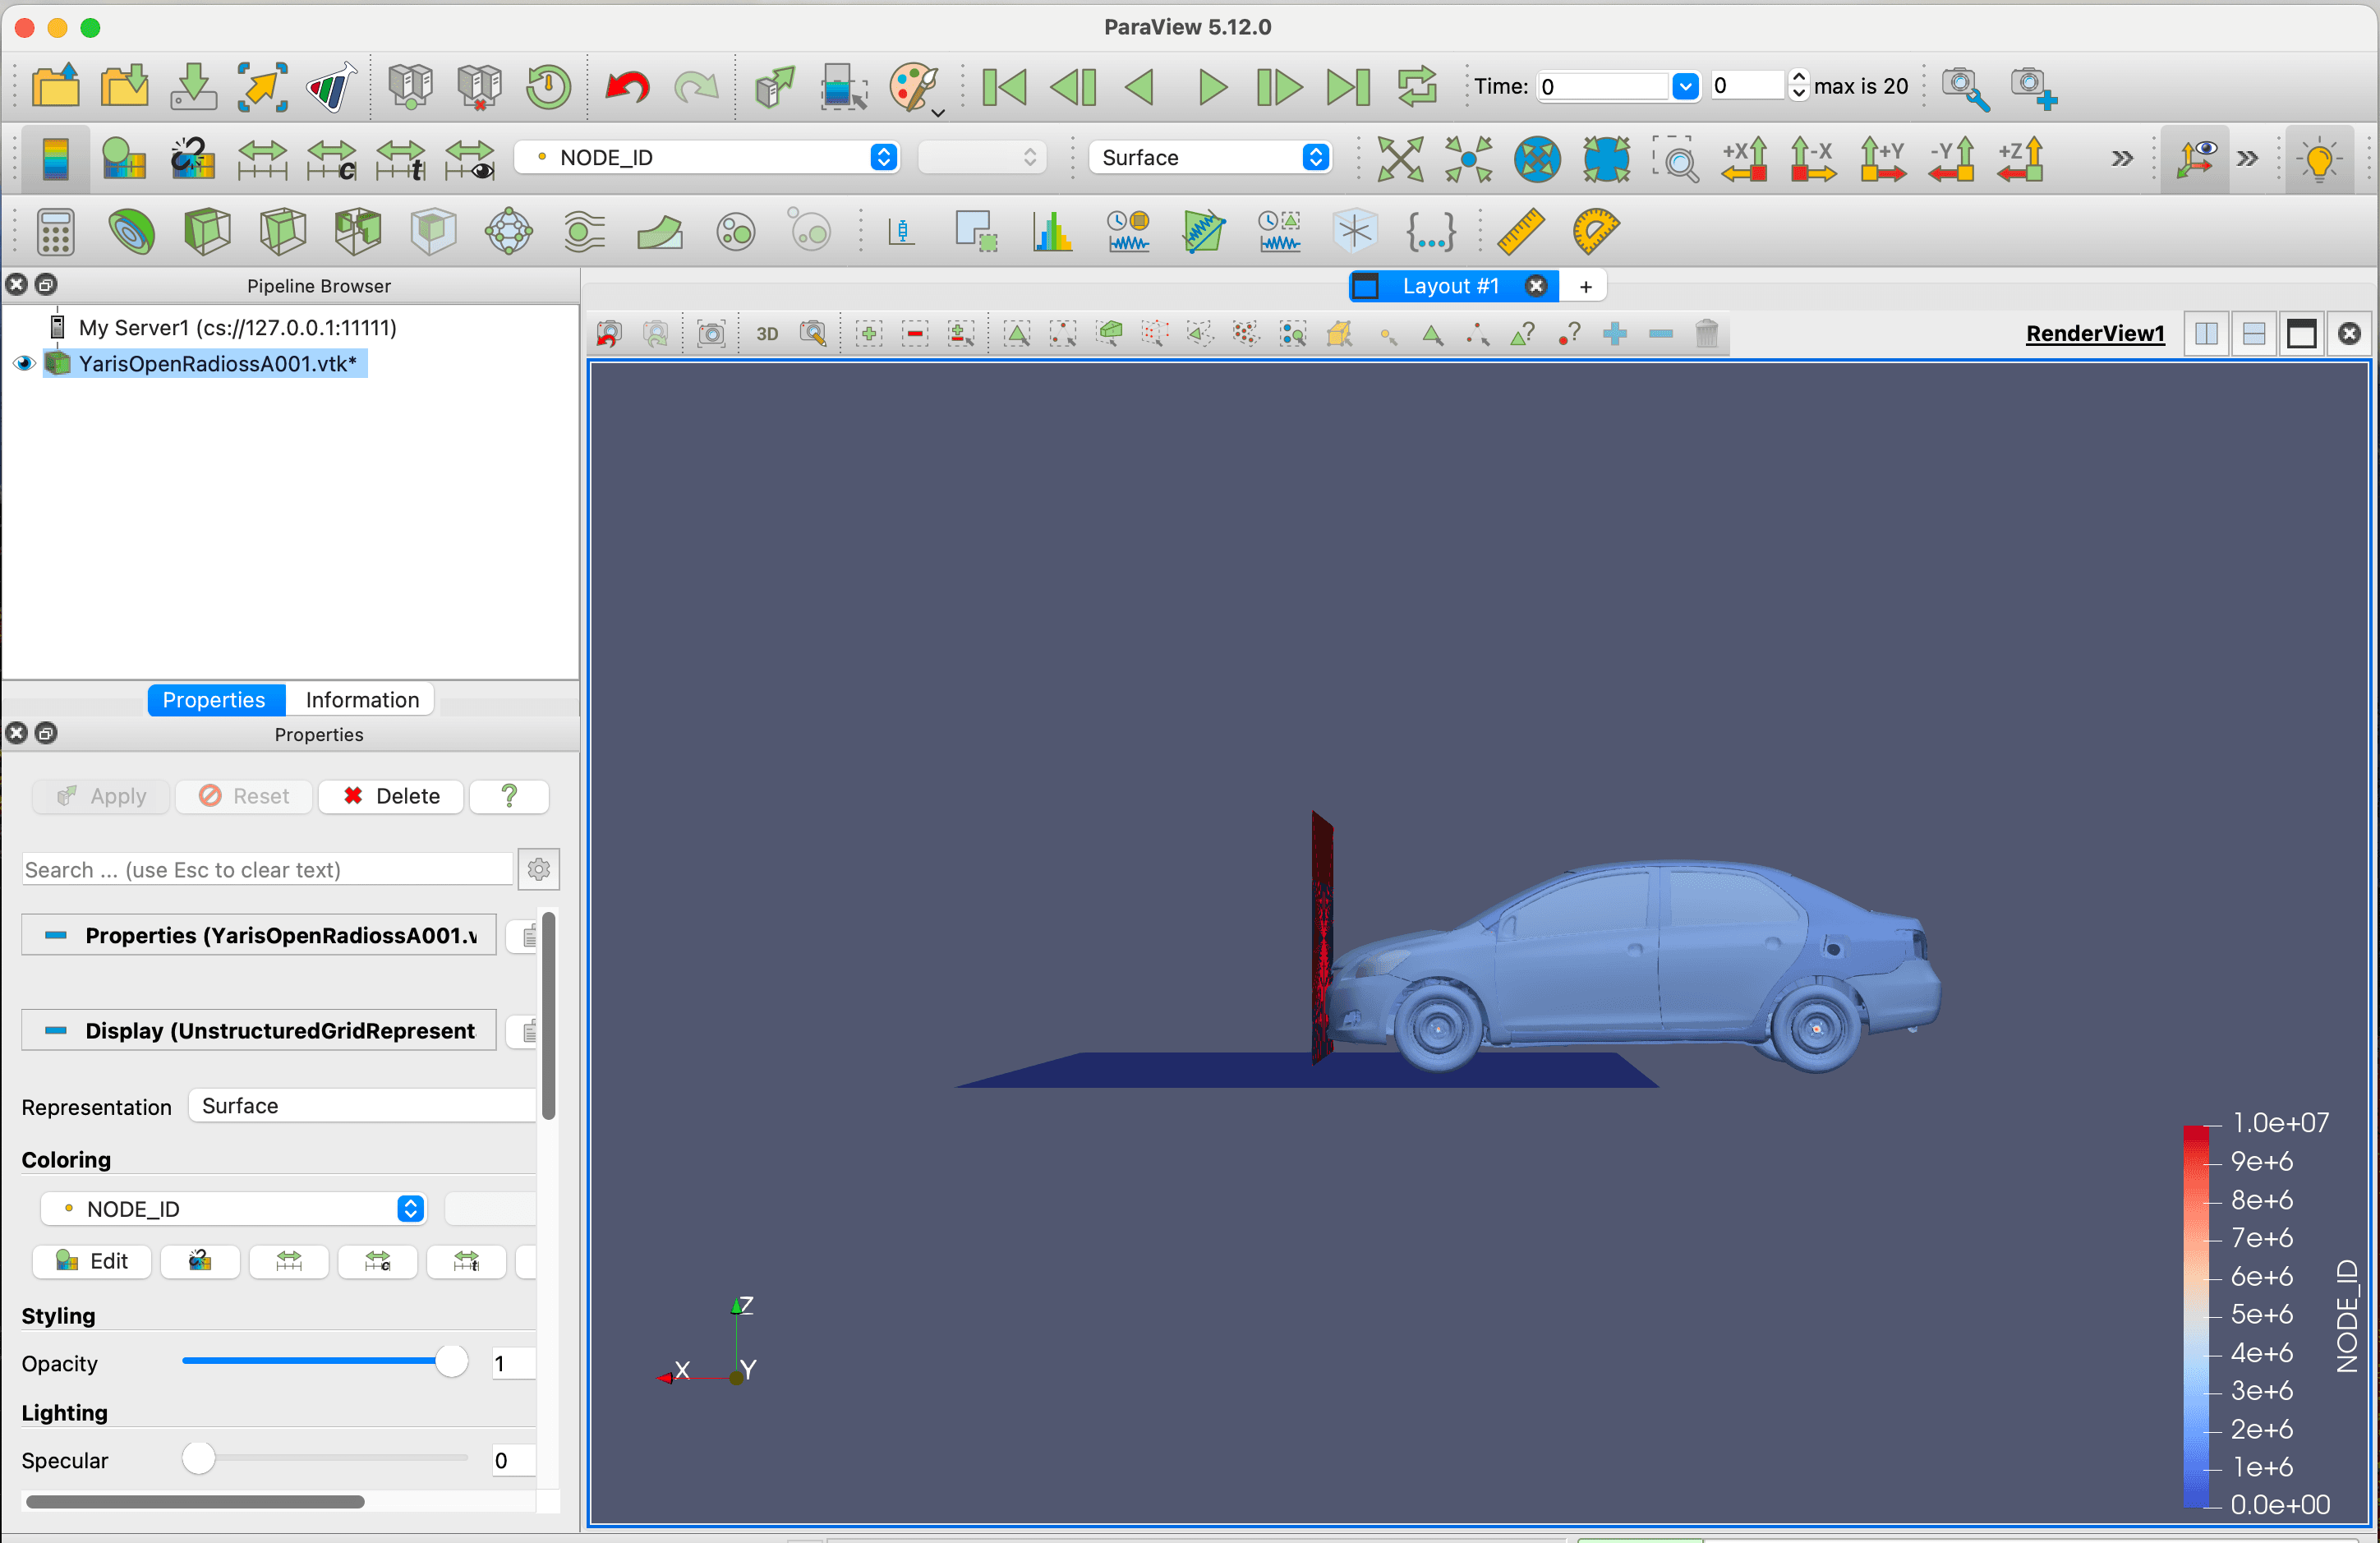
Connect to ParaView v5.12 server from ParaView v5.12 client
Launch the ParaView v5.12 client on your laptop. And connect to the server 127.0.0.1:11111. Please see more detailed steps here.
You can check connection information from the About ParaView menu. You can confirm we are using NVIDIA A100 on Google Cloud for this visualization project.

This is right after you connect to the GPU server on Google Cloud and load VTK data on the server side:
Destroy HPC cluster
After you’ve enjoyed this article and are ready to tear down your HPC/GPU cluster on Google Cloud, go back to your laptop terminal, and execute this command:
$ cd ~/scientific-computing-examples/apptainer/cluster
$ ghpc destroy gputainer
Summary
We launched an HPC/GPU cluster using a Rocky Linux 8 HPC VM image, Cloud HPC Toolkit from Google Cloud, and an example blueprint available on Scientific Computing with Google Cloud repository. We walked through (1) a car crash simulation using OpenRadioss and HPC container solution Apptainer (formerly Singularity) with HPC compute nodes, and (2) remote visualization using ParaView and again Apptainer with GPU node. This reproducibility of Cloud HPC provisioning and mobility of compute gives you great agility and allows you to focus more on “doing great things.”


